
Update: Our drone kiosk FAA display was the subject of a recent article on maker site Tom’s Hardware: https://www.tomshardware.com/news/raspberry-pi-based-kiosk-display-shares-weather-faa-advisories-for-drones
At some point in the cold, wintry days of late 2019 we were looking ahead to the blooming flowers and long UAS flight times of Spring 2020, wondering ‘what could we make that would be functional, helpful and unique for our own UAS base?‘. The answer was clear: a kiosk display! Not just any display but a drone-centric kiosk that displays the weather forecast for the current day along with current local radar, alternating with another screen that reports all FAA advisories in our local airspace. Every 30 seconds the two screens switch back-and-forth and all displayed data is refreshed every 5 minutes to provide current information.
Let’s take a look at what our kiosk screens look like. Here are screenshots from the custom unit we built for our local college’s drone program (Warren County Community College, NJ):
Screen #1a (WITHOUT local FAA Advisories currently):
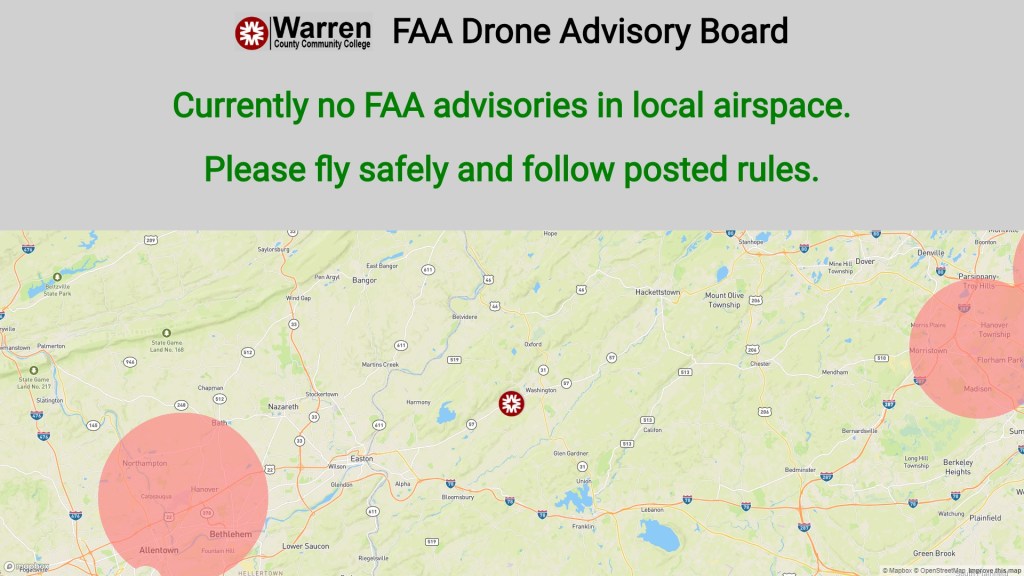
Screen #1b (WITH local FAA Advisories currently):

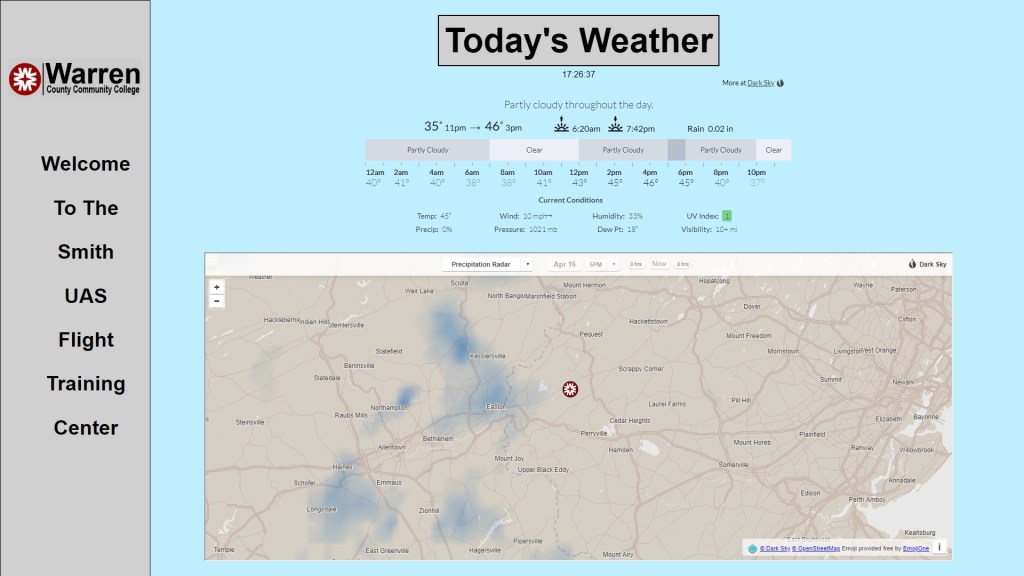
Screen #2 (Today’s Weather):
For our display we are using a 32″ LED television that we bought for $120 (TCL 32″ Class 720P HD LED Roku Smart TV 3 Series 32S331). We designed the kiosk to shut off at night and turn back on in the morning (why waste energy when you can’t fly the UAS at night anyway?). Because of that requirement we needed a ‘smart’ display that is able to respond to commands sent by the RaPi (turn on/off)*. Since the sunset/sunrise hours vary by month we made this variable so it will turn off around 6pm in the winter months up to 9pm in the summer, same with the hours it turns on. When the RaPi goes to sleep overnight the display is smart enough to shut itself off when it detects no incoming signal over HDMI. In the morning when RaPi wakes up the display automatically turns on when it detects an HDMI signal. *See the settings we use on this display itself at the bottom of this article
In order to have dynamic content such as our kiosk does (content changes regularly) you will need some sort of internet connection. We have our RaPi capable of connecting to a list of 3 or 4 wireless access points so we can plug it in at our lab and it will connect automatically there as well as at the customer’s wifi router with different credentials. If you only need static content such as displaying your company (or personal) photos of your UAS fleet or recent projects then the wifi connection isn’t necessary.
Now that we have an idea of what our end product will look like, let’s dig into how we got there.
Here are the hardware items needed:
- Raspberry Pi 3 Model B or newer (3 B+, 4, etc). – Cost: $35
- CanaKit RaPi 3 Case – Cost: $10
- Smart Display – Cost: $100-120 (we used TCL 32″ 720P HD LED Model 32S331)
Here are the programming skills needed:
- Basic Python programming
- Basic HTML/Javascript
- Linux commands (create/update RaPi directory files, copying jpeg files to RaPi, etc)
Here are some of the free programs needed:
- Win32DiskImager (copy Raspbian operating system to SD Card)
- PuTTY (to SSH into RaPi on Windows)
- Weather API (or embed weather widget)
- FAA Advisory API (AirMap)
- FAA Advisory Map Display (MapBox)
If you do not have any experience programming in Python, fret not as there are many helpful YouTube videos that can get you up to speed in a hurry. Fortunately, for this project you won’t need vast Python knowledge just enough to be able to decipher what some of the main (existing) Raspbian files are doing and once you become comfortable with that you are well on your way. 99% of the files needed are already present in the Raspbian operating system, some files may just need tweaking or minimal code added. The Raspberry Pi organization has a nice tutorial for beginners regarding Python.
Our project is based on the Raspberry Pi (RaPi) which is essentially a Linux computer in a small package. There are many variations of the RaPi however they are all very affordable. For our kiosk we are using a ‘headless’ version (no GUI screen, mouse) which requires much less memory usage and all navigation/programming is performed in the Command Line Interface (CLI). Note that in our case we are rendering dynamic web pages with relatively large memory usage for the radar display and API calls so a Raspberry Pi Zero W ($10) with lower RAM (512 MB) wasn’t able to handle that. However if you are just rendering static web content a Zero W may work for you.
Once you receive your RaPi in the mail you’ll need to install the free operating system, Raspbian. Download this from the official Raspberry Pi Raspbian download page, we selected the Lite version which is the headless version. From that downloaded zip file you will then extract and copy the .img file to an SD card which will house the operating system for your RaPi. Depending on if your computer is Mac or Windows, the method of copying the .img file to your SD card will differ. We are using Windows so used Win32DiskImager software (free). Once that has successfully installed on the SD card you will then insert that into your RaPi and connect to your computer using a USB cable and SSH into it using PuTTY.
Follow these helpful guides linked below for the necessary steps from loading your Raspbian operating system through setting it up in kiosk mode:
Dan Purdy’s Raspberry Pi Kiosk Screen Tutorial – This gets you from initial Raspbian install up to a functional kiosk
Wired Zero’s Detailed Instructions on Setting up RaPi Kiosk – Phenominal video along with list of Linux commands you can copy/paste when setting up the kiosk through SSH
Medium.com How to build a web kiosk with a Raspberry Pi, some cables, and a TV – Same ideas as the links above, just another approach to setting up a kiosk that links to an external URL and display its contents
Just as our kiosk is different than those shown above (ours is drone-centric), yours will likely be different from ours so some customization will be needed. Here is where Google and YouTube (or Bing and Vimeo) are necessary tools to get you through the fog.
For our kiosk, in a nutshell we have two HTML pages that RaPi renders and displays through the HDMI port/cable to the TV. One page is for the weather and the other is for the FAA advisories. For the weather page we have simple HTML that embeds free widgets from DarkSky where we send our local parameters (zip code) and it returns an embedded object with forecast and a separate section for local radar.
Note: As of this writing, we visited the DarkSky website to provide a link here and noticed that they were picked up by Apple so their API is no longer accepting new customers and their weather API and widgets will end in 2021. There are many other weather API’s and widgets that you can use such as OpenWeatherMap, WeatherBit, AccuWeather, among many, many others.
This brings up an important point around the referencing and usage of API’s anywhere: the API code base will change, it’s not a matter of IF but WHEN they change. Another example is a separate API we are using for the FAA Advisories, through AirMap. When we first built this kiosk last November it was working great, we had the kiosk running 24/7 in our lab. One day we noticed that the FAA Advisory page was showing a blank map which was unusual. Digging further we found that AirMap had gutted their old API code and required new parameters. This meant their old code was deprecated and wouldn’t work any longer. We were able to update our FAA Advisory page so the code worked (~10 hours of coding/testing) but just keep in mind that what you code today may not work two years from now and updates may be needed.
A bit more info on the AirMap Advisory API, you’ll just need to apply for a free developer key and you’ll use that in your HTML code whenever making API calls from HTML. Our RaPi web page for advisories makes a cURL call to GET the AirMap advisories in our area. This returns a set of JSON packets which show the advisory id, description, lat/lon, city, state, airspace class, type of advisory, color of advisory and other items. We display some of those fields in a basic HTML table and use the color of the advisory (red, green, orange) as the cell background color. Note that the AirMap API sometimes returns duplicate responses for the same advisory. You can remove those duplicates in your HTML/Javascript code, later on we show how to do that.
Here’s an example of the returned JSON data from AirMap:
{
  "status": "success",
  "data": {
    "color": "orange",
    "advisories": [
      {
        "id": "4684250",
        "name": "HAWTHORNE CLASS D requires FAA authorization, permissible below 400 ft",
        "last_updated": null,
        "latitude": 33.8583459,
        "longitude": -118.375023,
        "distance": 757,
        "type": "controlled_airspace",
        "city": "Redondo Beach",
        "state": "California",
        "country": "USA",
        "rule_id": 5069,
        "ruleset_id": "usa_part_107",
        "properties": {
          "url": "https://www.faa.gov/uas/request_waiver/",
          "ceiling": 400,
          "airport_id": "HHR",
          "airport_name": "Jack Northrop Fld/Hawthorne Muni",
          "airspace_classification": "D",
          "type": "d"
        },
        "color": "orange",
        "requirements": {
          "notice": {
            "phone": null,
            "digital": false
          }
        }
      },
A separate part of our FAA Advisory page is the actual map that displays the returned FAA advisories. As shown above, if there aren’t any advisories in our immediate area (red or orange circle over our home lat/long) then we display a message ‘Currently no FAA advisories in local airspace. Please fly safely and follow posted rules‘. If there ARE advisories we display those in a HTML table and the map will update with the red circle having a width dependent on how wide that advisory is extended.
This map is rendered on the page by an AirMap affiliated service called MapBox Contextual Airspace Plugin. This is a free service and is Javascript-based to use within your HTML page. In short, we use the parameters sent back to us from the AirMap API, which may be several objects/advisories, and send them to the MapBox API in an array which will render each of those advisories on the embedded map on our page, so we can visualize where those advisories are.
Here are most of the files that we customized in Raspbian:
/etc/wpa_supplicant/wpa_supplicant.conf
This file holds the wifi parms needed to connect automatically to an access point (you can have more than one set):
ctrl_interface=DIR=/var/run/wpa_supplicant GROUP=netdev
update_config=1
country=US

network={
        ssid="wifi001"
        psk="uR4Ge8s"
        id_str="droneport"
        priority=1
}
network={
        ssid="droneport99"
        psk="weroadso"
        id_str="dronelab"
        priority=3
}
/var/www/html/index.php
This is the main HTML/PHP page (1 of 2) which displays the AirMap advisories in a table and the MapBox map below that, showing them geographically. For the most part you can copy/paste the code from each respective developer docs. Here are two of the trickiest parts we found when creating this page:
1) The cURL GET call to AirMap which returns the FAA advisories in JSON packets. Note that these variables (e.g. $lat, $lng, etc) are stored elsewhere in our code but you can hardcode them here:
function cURL() {
        global $lat, $lng, $airmapOpt, $airmapKey, $polylat1, $polylng1, $polylat2, $polylng2, $polylat3, $polylng3, $polylat4, $polylng4, $ruleset1;
        $qry_str = "/advisory/v1/airspace?geometry=%7B%22type%22:%22Polygon%22,%22coordinates%22:%5B%5B%5B" . $polylng1 . "," . $polylat1 . "%5D,%5B" . $polylng2 . ","$
        $ch  = curl_init();
        $url = "https://api.airmap.com";
        curl_setopt($ch, CURLOPT_RETURNTRANSFER, true);
        curl_setopt($ch, CURLOPT_URL, $url . $qry_str);
        curl_setopt($ch, CURLOPT_CUSTOMREQUEST, 'GET');
        curl_setopt($ch, CURLOPT_HTTPGET, 1);
        curl_setopt($ch, CURLOPT_HTTPHEADER, array(
         'X-API-Key:' . $airmapKey
        ));
        $result = curl_exec($ch);
        echo $result;
        return $result;
        if (!curl_errno($ch)) {
                $info = curl_getinfo($ch);
                echo 'Took ', $info['total_time'], ' seconds to send a request to ', $info['url'], "\n";
        }
        curl_close($ch);
    }
2) Remove duplicates. The AirMap API returns a JSON packet with duplicate advisories in some cases, use this javascript function to remove dups.
  function removeDuplicates(originalArray, prop) {
     var newArray = [];
     var lookupObject  = {};
     for(var i in originalArray) {
        lookupObject[originalArray[i][prop]] = originalArray[i];
     }
     for(i in lookupObject) {
         newArray.push(lookupObject[i]);
     }
      return newArray;
     }

     var uniqueArray = removeDuplicates(rawdata.data.advisories, "name");
/var/www/html/weather.php
As the page name would suggest, this HTML/PHP page is for displaying the weather data (page 2 of 2). We are simply embedding DarkSky widgets with our lat/lng.
<div class="main">
  <br>
<table style="width:100%;align:center;">
<tr align="center"><td align="center">
<br>
<span align="center" style="font-size:400%;vertical-align: bottom;background-color:#D0D0D0;border:2px solid black;padding: 10px;"><b>Today's Weather</b></span>
<br><br>
<div class=#clock><span id="clock">...</span></div>
<script type='text/javascript' src="https://darksky.net/widget/graph-bar/<?php echo $lat ?>,<?php echo $lng ?>/us12/en.js?width=100%&height=320&title=Full Forecast&tex$
</td></tr>
<tr align="center"><td>

<div class="radar">
  <iframe src="https://maps.darksky.net/@radar,40.696,-75.009,10" style="width:1400px; height: 575px;overflow: hidden; left: -100px; top: -100px;">
</div>

</td></tr>
</td></tr>
</div>
…you’ll notice in the weather page photo above that there is an icon identifying the droneport location in the center of the radar. You can also do this with a .png file for the icon and use this css in your header (you’ll need to update the ‘top’, ‘left’, ‘width’ and ‘height’ variables to match your display/content):
   .radar:after {
    content: "";
    position: absolute;
    display: inline-block;
    top: 715;
    left: 1055;
    width: 27px;
    height: 28px;
    z-index: 100;
    border: solid 1px;
    border-radius: 100%;
    background: transparent url(WCCC03.png) no-repeat center;
    }
/etc/xdg/openbox/autostart
This is the page which RaPi references when it starts up and is running, it outlines what to display and how to act. Note that we are using –kiosk mode and also references our two web pages http://127.0.0.1 and http://127.0.0.1/weather.php.
The xdotool commands below that are telling the RaPi to ctrl/tab between those two pages. After a few minutes of that we refresh both pages (ctrl+r) to get current data and display that.
xset s off
xset s noblank
xset -dpms
# Allow quitting the X server with CTRL-ATL-Backspace
setxkbmap -option terminate:ctrl_alt_bksp
# Start Chromium in kiosk mode
sed -i 's/"exited_cleanly":false/"exited_cleanly":true/' ~/.config/chromium/'Local State'
sed -i 's/"exited_cleanly":false/"exited_cleanly":true/; s/"exit_type":"[^"]\+"/"exit_type":"Normal"/' ~/.config/chromium/Default/Preferences
chromium-browser --noerrdialogs --incognito --disable-infobars --kiosk http://127.0.0.1 http://127.0.0.1/weather.php &
while true; do
   xdotool keydown ctrl+Tab; xdotool keyup ctrl+Tab;
   sleep 30
   xdotool keydown ctrl+Tab; xdotool keyup ctrl+Tab;
   sleep 20
   xdotool keydown ctrl+Tab; xdotool keyup ctrl+Tab;
   sleep 30
   xdotool keydown ctrl+Tab; xdotool keyup ctrl+Tab;
   sleep 20
   xdotool keydown ctrl+Tab; xdotool keyup ctrl+Tab;
   sleep 30
   xdotool keydown ctrl+Tab; xdotool keyup ctrl+Tab;
   sleep 20
   xdotool keydown ctrl+Tab; xdotool keyup ctrl+Tab;
   sleep 30
   xdotool keydown ctrl+Tab; xdotool keyup ctrl+Tab;
   sleep 20
   xdotool keydown ctrl+r; xdotool keyup ctrl+r; xdotool keydown ctrl+Tab; xdotool keyup ctrl+Tab;
   sleep 30
   xdotool keydown ctrl+r; xdotool keyup ctrl+r; xdotool keydown ctrl+Tab; xdotool keyup ctrl+Tab;
   sleep 20

done
/etc/dhcpcd.conf
This file is used by the core system to show it what type of connections to use (ethernet vs wifi, etc). This file will already be populated but needs to be modified for your situation. We have ours like this at the bottom of the file:
interface wlan0
# define static profile
profile static_eth0
#home static_eth0
static ip_address=10.0.0.38
static routers=10.0.0.1
static domain_name_servers=10.0.0.1

profile static_wlan0
static ip_address=10.0.0.38
static routers=10.0.0.1
static domain_name_servers=10.0.0.1


# fallback to static profile on eth0
interface eth0
fallback static_eth0

# fallback to static profile on wlan0
interface wlan0
fallback static_wlan0
/etc/network/interfaces
One word of caution, many older posts around Raspbian will say to modify this file. However starting a few years ago that is obsolete and updating it may brick your RaPi (you can’t access via SSH). This is what we have in this file, again beware of updating it. The current place to update what this interfaces file used to is now in the wpa_supplicant.conf file shown above.
# interfaces(5) file used by ifup(8) and ifdown(8)

# Please note that this file is written to be used with dhcpcd
# For static IP, consult /etc/dhcpcd.conf and 'man dhcpcd.conf'

# Include files from /etc/network/interfaces.d:
source-directory /etc/network/interfaces.d
auto lo
iface lo inet loopback
/etc/crontab
Last but not least, this crontab file tells RaPi when to turn itself off and when to turn on (vcgencmd command) along with other cron jobs that you want to automate. Here is our file which varies the ‘on/off’ by month. Note that military time is used for hours.
SHELL=/bin/sh
PATH=/usr/local/sbin:/usr/local/bin:/sbin:/bin:/usr/sbin:/usr/bin

# Example of job definition:
# .---------------- minute (0 - 59)
# |  .------------- hour (0 - 23)
# |  |  .---------- day of month (1 - 31)
# |  |  |  .------- month (1 - 12) OR jan,feb,mar,apr ...
# |  |  |  |  .---- day of week (0 - 6) (Sunday=0 or 7) OR sun,mon,tue,wed,thu,fri,sat
# |  |  |  |  |
# *  *  *  *  * user-name command to be executed
17 *    * * *   root    cd / && run-parts --report /etc/cron.hourly
25 6    * * *   root    test -x /usr/sbin/anacron || ( cd / && run-parts --report /etc/cron.daily )
47 6    * * 7   root    test -x /usr/sbin/anacron || ( cd / && run-parts --report /etc/cron.weekly )
52 6    1 * *   root    test -x /usr/sbin/anacron || ( cd / && run-parts --report /etc/cron.monthly )
0 6     * 4,5,6,7,8 *   root    shutdown -r now
0 7     * 1,2,3,9,10,11,12 *   root    shutdown -r now
0 17    * 1,11,12 *   root    vcgencmd display_power 0
0 18    * 2 *   root    vcgencmd display_power 0
0 19    * 3,9,10 *   root    vcgencmd display_power 0
0 20    * 4,5,8 *   root    vcgencmd display_power 0
0 21    * 6,7 *   root    vcgencmd display_power 0
34 8-16    * * *   root    echo "on 0" | /usr/bin/cec-client -s -d 1
#
In the vcgencmd commands above we are rebooting (shutdown -r) the RaPi at 6am on months 4 thru 8 and at 7am on the other months. We reboot just in case it has become frozen at some point during the prior day or overnight. To turn off the monitor we use the vcgencmd ‘display_power 0’. The times used to power off varies by month also. Notice the ‘echo “on 0″‘ command that we send at 34 minutes past the hour from 9am to 4pm. This is just in case the power was tripped during the day, it will turn on the display if so. Note that turning off the monitor signal (HDMI) does not actually turn off the RaPi. The smart CEC display senses a loss of signal so turns itself off.
Smart Display Settings
We used a TCL smart tv but you can use any type of display that has CEC settings available. Here are the settings we used to allow it to turn on and off when the RaPi sends the vgencmd commands:


Blueprint plans for outdoor kiosk station
Here are the plans we designed for the outdoor kiosk station at the droneport. It is not noted here but the LED display will be behind a sheet of plexiglass and that compartment sealed so moisture is not able to get in there. Of course this station isn’t necessary you can simply hang the display up indoors on a wall like fine art.

Conclusion
In this article we highlighted many of the main points but were unable to cover every bit of information needed to get your kiosk up and running (not sure that is possible in a single page). Hopefully the information provided here will get you started in the right direction though. In this era some of us may have more time for projects such as this, a project that will definitely make that drone pilot in your life smiling for years to come.
Good luck and happy flying!
